Getting your iPad 10th Generation hooked up with an external keyboard isn't just about typing faster; it's about transforming your tablet into a true productivity powerhouse. Whether you're drafting an urgent email, taking extensive notes in a lecture, or just navigating iPadOS with the precision of a cursor, a physical keyboard unlocks capabilities the on-screen option just can't match. This guide will walk you through precisely how to connect, pair, and set up your iPad 10th Gen keyboard, ensuring a seamless experience.
Forget fumbling with virtual keys; it's time to elevate your iPad workflow.
At a Glance: Key Takeaways for iPad Keyboard Connection
- Three Main Ways: You can connect a keyboard via the Smart Connector (for Apple's Magic Keyboard Folio), Bluetooth (for most wireless keyboards), or USB-C (for wired keyboards with an adapter).
- Smart Connector is Instant: Magnetic keyboards like the Magic Keyboard Folio connect instantly without pairing or charging.
- Bluetooth Needs Pairing: Wireless keyboards require a one-time pairing process through your iPad's Bluetooth settings, often involving a code.
- USB-C is Plug-and-Play: Wired keyboards connect via a USB-C adapter and are usually recognized immediately.
- Troubleshooting First Steps: Always check battery levels, restart devices, and ensure compatibility if you encounter issues.
- Keep Connectors Clean: For Smart Connector issues, a quick wipe can often resolve the problem.
Unlocking Your iPad's Potential: Why a Keyboard Matters
Your iPad 10th Gen is a marvel of portability and power, but its full potential for creation often lies just beyond its glass screen. While the virtual keyboard is fantastic for quick messages and light browsing, tasks like writing detailed reports, coding, or managing spreadsheets become significantly more efficient with tactile keys. An external keyboard doesn't just speed up your typing; it reduces screen clutter, frees up valuable display space, and allows for more ergonomic posture during extended use. Think of it as adding a turbocharger to your favorite sports car – it's already fast, but now it can truly fly.
For many, the biggest decision isn't if they should use an external keyboard, but which one to choose. The iPad 10th Generation is versatile, supporting a range of options from Apple's own Smart Connector-enabled Magic Keyboard Folio to a vast ecosystem of Bluetooth accessories and even traditional wired keyboards. Each method has its own charm, and understanding them is the first step to a flawless connection.
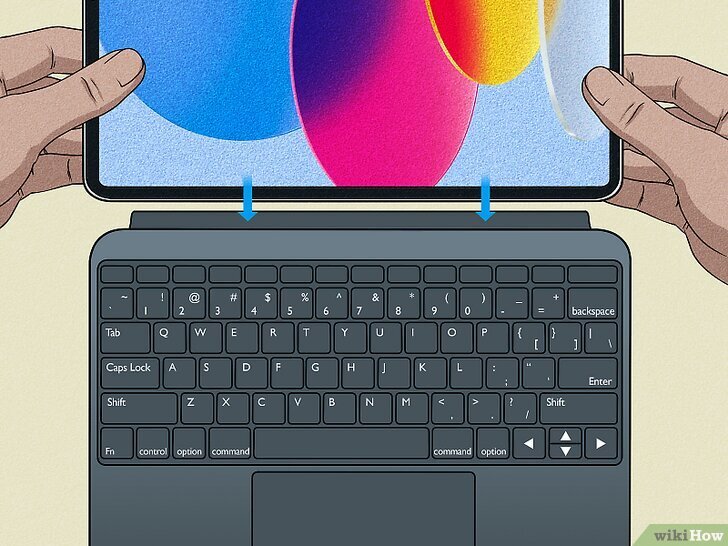
The Smart Connector Advantage: Attaching Your Magic Keyboard Folio
For many iPad 10th Gen owners, Apple's Magic Keyboard Folio is the go-to choice. It's designed specifically for your iPad model and leverages the ingenious Smart Connector. This isn't just a fancy name; it's a dedicated magnetic and electrical interface that makes connection literally instant and effortless. No pairing, no batteries to charge (for the keyboard itself), no fuss.
How the Magic Keyboard Folio Connects
- Prepare Your iPad: Ensure your iPad 10th Gen is clean, especially around the three small magnetic pins on one of its longer edges. A quick wipe with a dry, lint-free cloth removes any dust or debris that could impede the connection.
- Position the Keyboard: Orient your Magic Keyboard Folio so its Smart Connector aligns with the pins on your iPad. You'll often find a slight indentation or guiding magnets on the keyboard itself.
- Let the Magnets Do the Work: Bring the keyboard close to the iPad. You'll feel the powerful magnets snap the keyboard into the correct position. A satisfying click usually confirms a secure attachment. The iPad should instantly recognize the keyboard, and the on-screen keyboard will disappear.
- Test It Out: Open any app where you can type—Notes, Pages, Safari search bar—and start typing. If everything's working, you're good to go!
Why the Smart Connector Shines
The beauty of the Smart Connector is its simplicity and reliability. Because it draws power directly from the iPad and transfers data instantly, there's virtually no lag, and you never have to worry about charging the keyboard itself. It's a truly plug-and-play (or rather, "snap-and-play") experience that makes it ideal for those who want a seamless, integrated feel.
Going Wireless: Pairing a Bluetooth Keyboard
Bluetooth keyboards offer the widest variety and often the greatest flexibility, allowing you to use your iPad 10th Gen from a comfortable distance. This method is universal, working with almost any iPad-compatible wireless keyboard from various manufacturers. It does, however, require a brief pairing process, much like connecting wireless headphones.
Step-by-Step Bluetooth Pairing
- Power On and Activate Pairing Mode: First, ensure your Bluetooth keyboard is charged and switched on. Most Bluetooth keyboards have a dedicated power switch and a button or key combination (often labeled "Pair," "Connect," or with a Bluetooth symbol) to put them into pairing mode. Consult your keyboard's manual for the exact steps—this is crucial! Typically, an indicator light will start blinking to signal it's ready to connect.
- Open iPad Settings: On your iPad 10th Gen, tap the "Settings" app (it looks like a gray gear icon) on your Home Screen.
- Navigate to Bluetooth: In the Settings menu, tap "Bluetooth" on the left sidebar.
- Toggle Bluetooth On: Make sure the Bluetooth switch at the top of the screen is toggled to the "on" (green) position. Your iPad will immediately begin scanning for nearby discoverable Bluetooth devices.
- Find and Tap Your Keyboard: Under the "Other Devices" list, you should see the name of your Bluetooth keyboard appear (e.g., "Logitech K380," "Apple Magic Keyboard," "My Keyboard"). Tap on its name.
- Enter the Pairing Code (If Prompted): Your iPad might display a numeric pairing code (e.g., "1234"). You must type this code directly onto your external Bluetooth keyboard, then press the "Enter" or "Return" key on that keyboard. Do NOT type it on the iPad's on-screen keyboard.
- Confirm Connection: Once the code is entered correctly, your keyboard's name should move from "Other Devices" to "My Devices" and show "Connected." You're now ready to type!
Actionable Insights for Bluetooth
- Compatibility is Key: Most modern Bluetooth keyboards are compatible with iPadOS, but always double-check the product specifications if you're unsure.
- Battery Life: Remember that Bluetooth keyboards run on their own batteries and will need recharging or new batteries periodically.
- One-Time Setup: After the initial pairing, your iPad will usually remember the keyboard. As long as Bluetooth is on and the keyboard is powered on and in range, it should reconnect automatically next time. If not, just tap its name in the Bluetooth settings.
- Curious about finding the perfect match? Explore our guide on the best keyboards for iPad 10th Gen to see a curated selection.
The Wired Way: Connecting a USB Keyboard with an Adapter
While less common for an iPad, a traditional wired USB keyboard can also be connected to your iPad 10th Gen, thanks to its versatile USB-C port. This method is fantastic if you already own a favorite mechanical keyboard or want to ensure a zero-latency, always-on connection without worrying about batteries or pairing.
Connecting a USB Keyboard
- Gather Your Gear: You'll need your USB keyboard and a USB-C to USB-A adapter. Your iPad 10th Gen has a USB-C port, but most wired keyboards use a standard USB-A connector, so the adapter acts as a bridge. You can find these adapters easily online or at electronics stores.
- Plug in the Adapter: Firmly insert the USB-C end of the adapter into your iPad's USB-C port.
- Connect Your Keyboard: Plug the USB-A connector of your wired keyboard into the USB-A port on the adapter.
- Automatic Detection: Your iPad 10th Gen should automatically detect the keyboard. There's no pairing code or manual setup required. You can immediately begin typing.
Considerations for Wired Keyboards
- Port Occupancy: The USB-C port will be occupied, meaning you can't use it for charging or other accessories simultaneously unless you use a multi-port USB-C hub.
- No Batteries, No Lag: The advantage is a completely stable, lag-free connection that doesn't rely on keyboard batteries.
- Portability Impact: This setup can be less portable due to the need for an adapter and the physical cable, but it's great for a stationary desk setup.
When Things Go Sideways: Troubleshooting Common Keyboard Issues
Even with the best intentions, connections can sometimes be finicky. Here’s how to diagnose and fix the most common keyboard problems you might encounter with your iPad 10th Gen.
General Connection Headaches
- Is Your Keyboard Charged? This seems obvious, but it's often overlooked for Bluetooth or other wireless keyboards. Low battery levels can prevent pairing or cause erratic behavior.
- Is It Compatible? Double-check that your keyboard is designed to work with iPadOS. Most are, but some niche keyboards might have specific requirements.
- Restart Everything: The classic tech fix. Restarting your iPad (hold the power button and either volume button, then slide to power off) and then your keyboard can clear temporary glitches.
- Stay in Range: For Bluetooth keyboards, ensure you're within about 30 feet (10 meters) of your iPad. Walls and other obstacles can reduce this range.
- Update iPadOS: Outdated software can sometimes lead to connectivity issues. Make sure your iPad is running the latest version of iPadOS by going to "Settings" > "General" > "Software Update."
Magic Keyboard Folio Isn't Connecting
If your Smart Connector keyboard isn't responding:
- Clean Those Pins! The most frequent culprit. Use a dry, soft cloth or even a pencil eraser (gently!) to clean the three magnetic Smart Connector pins on both your iPad's edge and the corresponding area on your Magic Keyboard Folio. Dust, lint, or even oil from your fingers can disrupt the electrical connection.
- Check for Warping: Very rarely, the keyboard's connector board might be slightly warped. Gently inspecting it for any visible bends and trying to slightly counter-bend it (if safe and minimal) can sometimes help.
- Re-Attach Firmly: Disconnect and re-attach the keyboard, ensuring a firm, secure magnetic connection.
Bluetooth Keyboard Pairing Fails Repeatedly
- Toggle Bluetooth: Go to "Settings" > "Bluetooth," turn Bluetooth off for 10-15 seconds, then turn it back on. This can refresh the connection.
- "Forget This Device": If your keyboard shows up under "My Devices" but won't connect, tap the "i" icon next to its name and select "Forget This Device." Then, restart the pairing process from step 1 (Power On and Activate Pairing Mode). This clears any corrupted pairing data.
- Check Keyboard Battery (Again): Some Bluetooth devices won't even attempt to pair if their battery is critically low (e.g., below 20% charge).
- Interference: Other nearby Bluetooth or Wi-Fi devices can sometimes cause interference. Try pairing in a different location or temporarily disabling other wireless devices.
On-Screen Keyboard Pops Up Unexpectedly
You've got your external keyboard connected, but the virtual keyboard keeps appearing!
- Toggle Shortcuts: Go to "Settings" > "General" > "Keyboard" > "Keyboards." Find the "Shortcuts" toggle and turn it off, then immediately turn it back on. This often resets the system's recognition of the external keyboard.
Lag or Delayed Response
- For Bluetooth Keyboards:
- Move Closer: Ensure your iPad and keyboard are close to each other.
- Reduce Interference: Move away from other electronics emitting wireless signals (e.g., Wi-Fi routers, cordless phones, wireless mice, speakers).
- For Smart Connector Keyboards:
- Clean Connectors: Re-clean the Smart Connector pins as described above.
- Check iPadOS Updates: Ensure your iPadOS is up-to-date, as software bugs can sometimes affect keyboard responsiveness.
Beyond the Setup: Getting the Most Out of Your Keyboard
Connecting your keyboard is just the beginning. To truly integrate it into your iPad 10th Gen workflow, here are a few extra pointers.
Disconnecting Your Keyboard
- Smart Connector Keyboards: Simply pull the iPad away from the keyboard. The magnetic attachment is designed for easy detachment.
- Bluetooth Keyboards:
- To temporarily disconnect: Turn off the keyboard, or turn off Bluetooth on your iPad ("Settings" > "Bluetooth").
- To remove permanently: Go to "Settings" > "Bluetooth," tap the "i" icon next to your keyboard's name, and select "Forget This Device."
- USB Keyboards: Simply unplug the keyboard from the adapter, and then the adapter from your iPad.
Reconnecting Keyboards
- Smart Connector: Just re-attach it magnetically.
- Bluetooth: If previously paired, simply turn the keyboard on. Your iPad should automatically reconnect if Bluetooth is enabled and the keyboard is in range. If not, go to "Settings" > "Bluetooth" and tap your keyboard's name under "My Devices."
- USB-C: Plug it back in!
Handling Multiple Keyboards
Yes, your iPad 10th Gen is smart enough to remember multiple keyboards! You can have several Bluetooth keyboards paired, and also attach a Smart Connector keyboard or a USB keyboard. However, only one keyboard can be actively used for typing at any given moment.
The iPad prioritizes connections. If you attach a Smart Connector keyboard, it generally takes precedence. If you have multiple Bluetooth keyboards paired, the iPad will usually connect to the last one used or the one currently turned on and in range. You can always manually select your preferred Bluetooth keyboard from the "My Devices" list in "Settings" > "Bluetooth." Your iPad can remember up to 10 paired Bluetooth keyboards, giving you plenty of options for different scenarios.
Your iPad, Supercharged and Ready
Connecting an external keyboard to your iPad 10th Gen is one of the simplest yet most impactful upgrades you can make. It unlocks a world of more efficient typing, improved navigation, and a more desktop-like experience without sacrificing the iPad's inherent portability and touch-first design. Whether you opt for the seamless integration of a Smart Connector keyboard like the Magic Keyboard Folio, the versatile freedom of a Bluetooth model, or the sturdy reliability of a wired setup, you're now equipped to choose and connect with confidence. So go ahead, plug in, pair up, and get ready to type your way to new levels of productivity.